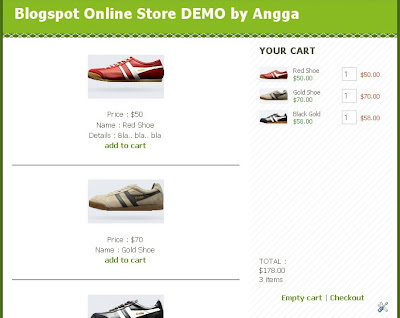
SimpleCart.js was developed by The Wojo Group. The cart (SimpleCart.js) is a tiny size javascript (10,5kb), very simple and usefull to handle blogger cart function. I have downloaded the javascript file and made an experiment with it for my Online Store Blogspot DEMO.

Online Store with free blogspot + SimpleCart + PayPal EXAMPLE :
These are steps, BEGINNER GUIDE to make a Simple Online Store Blogspot With SimpleCart DEMO
1. Download and Install the SimpleCart.js
You can download SimpleCart.js and save it into free file hosting (you can use Ripway.com or Google Sites).
If you want to skip (don't want to download) you can use my SimpleCart.js in my google site.
Simply go to your blogger account - Go to layout - edit HTML
Copy the code below and paste it precisely before <b:skin><![CDATA[
<!--Include the SimpleCart(js) script-->
<script charset='utf-8' src='http://sites.google.com/site/angga123site/simpleCart.txt' type='text/javascript'/>
<!--Make a new cart instance with your paypal login email-->
<script type='text/javascript'>
simpleCart = new cart("yourpaypalemail@yahoo.com");
</script>
Change yourpaypalemail@yahoo.com with your PayPal email address!
Save your template!
2. Install Your Cart CSS
Copy the CSS code, and paste it precisely before ]]></b:skin>
/* Your Cart */
.cartHeaders,.totalRow{display:none;}
.simpleCart_items{
overflow-y:auto;
overflow-x:hidden;
height:324px;
width:243px;
margin-bottom:20px;
}
.itemContainer{
clear:both;
width:229px;
padding:11px 0;
font-size:11px;
}
.itemImage{
float:left;
width:60px;
}
.itemName{
float:left;
width:85px;
}
.itemPrice{
float:left;
width:85px;
color:#418932;
}
.itemQuantity{
float:left;
width:33px;
margin-top:-12px;
vertical-align:middle;
}
.itemQuantity input{
width:20px;
border:1px solid #ccc;
padding:3px 2px;
}
.itemTotal{
float:left;
color:#c23f26;
margin-top:-6px
}
Save your template !
3. Create Product Page on Blogger Post
Create a new post, give the title and copy - paste the code below (in HTML mode)
<center>
<img src="http://sites.google.com/site/angga123site/redShoe.jpg" alt="Red Shoe" />
Price : $50
Name : Red Shoe
Details : Bla.. bla.. bla
<a href="#" onclick="simpleCart.add('name=Red Shoe','price=50','image=http://sites.google.com/site/angga123site/redShoethumb.jpg');return false;"> add to cart</a>
<hr>
<img src="http://sites.google.com/site/angga123site/goldShoe.jpg" alt="Gold Shoe" />
Price : $70
Name : Gold Shoe
<a href="#" onclick="simpleCart.add('name=Gold Shoe','price=70','image=http://sites.google.com/site/angga123site/goldShoethumb.jpg');return false;"> add to cart</a>
<hr>
<img src="http://sites.google.com/site/angga123site/blackGold.jpg" alt="Black Gold Shoe" />
Price : $58
Name : Black Gold
<a href="#" onclick="simpleCart.add('name=Black Gold','price=58','image=http://sites.google.com/site/angga123site/blackGoldthumb.jpg');return false;"> add to cart</a>
</center>
Publish Post !
4. Create "Your Cart Widget"
Go to Layout - Page Element - Add A Gadget - Choose HTML / Javascript
Copy and paste this code into your widget
<!--Add a Div with the class "simpleCart_items" to show your shopping cart area.-->
<div class="simpleCart_items">
</div>
TOTAL : <div class="simpleCart_total"></div>
<span class="simpleCart_quantity"></span> items
<br/>
<br/>
<!--Here's the Links to Checkout and Empty Cart-->
<center>
<a href="#" class="simpleCart_empty">Empty cart </a> |
<a href="#" class="simpleCart_checkout">Checkout</a></center>
Done ! Click Save and see the result.
Note : This article and Blogspot Online Store DEMO are for learning purposes only, not for commercial.
READ ALSO : Blogger Online Store Using FatFreeCart


